Showing posts with label virtual. Show all posts

Saturday, January 24, 2009

Ubuntu Christian Edition: Truth Remains Stranger Than Fiction

Hey There,

If you haven't had a chance yet, and you're the type who likes to mix your religion in with your work (oh yeah, and you're Christian ;), this Unique Ubuntu Distribution may be for you!

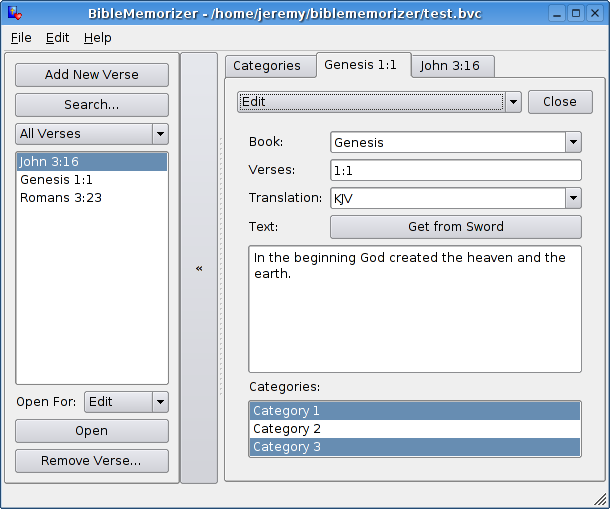
Ubuntu CE (or Christian Edition) offers the user many unique features, including (but not limited to) a Built-in Bible Memorizer (which will allow you to edit the Bible... like Wikipedia, except with the possibility of eternal damnation if you put something incorrect in there on purpose ;) and a Virtual Rosary, which (for some reason I have yet to understand) requires WINE. It would be too easy to go for the Holy Communion connection. Perhaps I'll have an epiphany after I'm finished running this distro through it's paces ;)

For now, enjoy the screenshots below and check out Ubuntu CE for yourself. Just like religion, it's free of charge but will accept donations ;)

May your deity be with you,

The Desktop That Makes You Feel Self-Conscious 24 Hours A Day
Jesus On The Desktop


Think You Can Make The Bible A Better Read? Now's Your Chance!
Edit The Bible


, Mike


Discover the Free Ebook that shows you how to make 100% commissions on ClickBank!


Please note that this blog accepts comments via email only. See our Mission And Policy Statement for further details.

Thursday, April 17, 2008

More Fun With Bash Networking

Greetings,

You may recall a post we did about a week or so ago on accessing the network directly with bash. Today's post is a bit of a follow up to that introduction, with some tips and clarification added for clarity and/or enjoyment ;)

1. The basic setup (this will be the only part revisited from our original post on bash networking. In order to get any of this started, you'll need to exec a file descriptor in bash. The file descriptor can, theoretically, be any number, but you should avoid 0, 1 and 2, as these are generally reserved by most Unix or Linux shells for standard input, standard output and standard error I/O. To exploit bash's "virtual" /dev/tcp filesystem (note that you can use /dev/udp as well; it just depends what you're planning on doing - if you wanted to interact with an old NIS server, you might "need" to use the udp protocol), the setup is simple enough. Assuming we wanted to use file descriptor 9 to hit a google web server on port 80, this is what we'd type on the command line:

host # exec 9<>/dev/tcp/www.google.com/80 <--- We've now connected to www.google.com.

2. The rest of it depends on what you want to do. The most basic operation would be to send information to the new file descriptor, read information from it and close it. Those three things can be done like this:

host # echo -e "GET /search?q=linux+unix+menagerie HTTP/1.0\n\n" >&9 <--- And now, we've requested a search page
host # while read line <&9
do
echo -n $line >&1
done
<--- Now, we read the HTML page that gets returned.
host # exec 9<&- <--- This closes the standard input for our new file descriptor
host # exec 9>&- <--- and this closes the standard output

3. Using HTTP 1.1 instead of 1.0. This is actually quite easily done (and you can do it through Telnet to port 80 on any given host, as well. Telnet will allow you to connect to any specified port on a host and interact with it. You just need to know what to type ;). It just requires a bit more typing on our part. Assuming we have the initial file descriptor set up, per step 1, we would do this to initiate an HTTP 1.1 connection and read from it.

host # echo -e "GET /search?q=linux+unix+menagerie HTTP/1.1" >&9 <--- Note the lack of the double carriage return. This isn't absolutely necessary, but if those returns are typed, they obviate the next line.
host # echo -e "Host: www.google.com\nConnection: close\n" >&9 <--- This line tells HTTP/1.1 that we want to close the connection once our query, or page request, completes. HTTP 1.1 will keep the connection open until it times out unless you do this, while HTTP 1.0 will close it immediately after you send one request.

And then you can go ahead and read the response and close the file descriptors in the same manner as above.

4. Implementing host headers. You may find that more and more web servers require "host headers" when you send them an HTTP 1.1 request. These, technically are only required for virtual hosting, but it's becoming more and more common for out-of-the-box webservers to run the main server as a virtual host. It's easy to send a request to our file descriptor in this manner, as well. We just need to modify it slightly.

host # echo -e "GET /search?q=linux+unix+menagerie HTTP/1.1\nhost: http://www.google.com\n\n" >&9

5. Sending a POST request rather than the standard GET. This again, is just a modification on the main method. All you need to tell the server is that you're performing a POST action and send it the POST data (This is basically how the folks in security check to see if they can mess with your cgi forms):

host # echo -e "POST /search?q=linux+unix+menagerie HTTP/1.1\n\nHere Are All My POST Variable=Value Pairs" >&9

6. Ignoring the header information when requesting an HTML page using bash networking through file descriptors. This is kind of "voodoo," but is almost 100% guaranteed to work. The first blank line you encounter when you read your response to the query you send to a web server is (almost) always the end of the header section. The header section includes varying information on web server type, version, age, etc, but isn't worth reading if you just want the web page back. You can avoid looking at it by running this after you make the initial GET request:

host # while read <&9
do
line=${response//$'\r'/}
if [ -z "$line" ]
then
break
fi
done


And then you can move on and continue reading from the file descriptor, and closing it, just like in step 2:

host # while read response <&9
do
echo -n $response >&1
done
exec 9<&-
exec 9>&-


7. What you get if you settle. Interestingly enough, bash's "virtual" tcp (or udp) filesystem defaults to connecting to a webserver. If you simply exec a new file descriptor without any arguments, the "virtual" /dev/tcp, and /dev/udp, file system is still created. It defaults to port 80 and the tcp protocol. In fact, the virtual file system "always" exists. Why? Because your shell automatically opens file descriptors 0, 1 and 2 when it initializes. So, basically, when you login, you've already got a path to the net :) How to use it meaningfully is another thing entirely, but you can do this right out of the gate, just after logging in:

host # echo -n "GET / HTTP/1.0\n\n" >/dev/tcp/www.google.com/80

although, thankfully, it doesn't work all that simply and involves serious risk.

Exec'ing an additional file descriptor is a better practice when doing this sort of thing, because you don't want to muck with the 3 basic ones. If you make a mistake on file descriptor 9, for example, it's no big deal if it gets disconnected or something else weird happens to it. If file descriptor 0 get whacked, you won't be able to type to the terminal, and if file descriptors 1 or 2 get destroyed, you won't be able to see some, or all, of the output the shell is sending to your terminal. In either case, you risk losing your connection to your terminal session entirely.

Again, you can use bash's "virtual" networking to connect to any port that already has a service listening on it. Unfortunately, as far as I know, at this time, there is no way to "initiate" (or bind to) a network port using this method and the bash shell (or any Unix or Linux shell, for that matter). If it ever becomes possible, I'll be sure to post about it, because it will open up a whole new can of worms for all of us ;)

Again, if you would like further basic explanation (and a sample script) regarding setting up bash's "virtual" network connections, see our previous post on bash file descriptor networking.

Cheers, and enjoy!

, Mike


Sunday, April 13, 2008

Finding Physical Network Devices And Their Paths On Solaris

Hey There,

This week's lazy Sunday post deals with something a lot of Unix sys admins may not have to do. At least not in this particular way. It's not uncommon to be asked where a network interface physically "is" on a server, or where a cable is connected, but that task can sometimes be made difficult if you don't have physical access to the machine. Seeing it, and adding that to the knowledge you've collected on the command line, is almost guaranteed to succeed.

For the most part it's relatively simple, on Solaris Unix, to figure out the device paths to your network cards if you're using Sun hardware. Basically, just the output of "ifconfig -a" will get you started:

host # ifconfig -a
lo0: flags=1000849 mtu 8232 index 1
inet 127.0.0.1 netmask ff000000
qfe0: flags=9040843 mtu 1500 index 2
inet 99.5.99.99 netmask ffffff00 broadcast 99.5.99.255
groupname GRP
ether 8:0:20:**:**:**
qfe0:1: flags=1000843 mtu 1500 index 2
inet 99.5.99.98 netmask ffffff00 broadcast 99.5.99.255


And you can tell that you only have the loopback device (which doesn't "really" count, although it's really bad "not" to have ;) and the qfe0 device.

Note that, if you have to find all the devices, even if they don't have cables attached, sometimes (if you have the latitude), running:

host # ifconfig -a plumb

Will make them show up in your "ifconfig" output. But you can most definitely find them by grepping the "qfe" network driver instance out of the /etc/path_to_inst file:

host # grep qfe /etc/path_to_inst
"/pci@8,700000/pci@3/SUNW,qfe@0,1" 0 "qfe"
"/pci@8,700000/pci@3/SUNW,qfe@1,1" 1 "qfe"
"/pci@8,700000/pci@3/SUNW,qfe@2,1" 2 "qfe"
"/pci@8,700000/pci@3/SUNW,qfe@3,1" 3 "qfe"


This shows you that there are actually 4 ports available, but, looking at "ifconfig," you can see that only port 0 is in use. Port 0 is supporting two separate IP's, but the qfe0:1 instance is "virtual" and doesn't indicate another physical port even though it does indicate another network address that's up on your machine.

Attached to the end of this post is a tiny script that will go through your "ifconfig -a" output and pick out the "real" devices that are up (no "virtuals" ;) and get the corresponding entry out of /etc/path_to_inst. It's not much, as far as script's go, but it's something you don't want to have to type too often ;)

Now comes the "iffy" part. Worst case, you'll have to go to the online manuals, or hard copy if you have it, to find this stuff out. For instance, on Sun v880's, the output from "prtdiag" does not show the device path for any of the pci devices. This makes it somewhat more difficult to figure out what PCI slot and/or port your network device is on, but it's still possible. Sometimes, it's just a matter of going through each line of output and determining what devices "couldn't" be the one you're looking for (Somewhat like the strategy you might use to pass an unnecessarily covoluted certification test.)

If you're fortunate enough, however, your machine may be able to help you make a direct correlation through the use of "prtdiag" (for instance, SunFire machines, up to at least the v440's, include this information. Some of Sun's newer machines have issues with spewing incorrect error messages when you use prtdiag. This shouldn't be an issue here, but just giving you a heads up in case you see any of those and think something else is wrong with your machine when it's perfectly fine).

For this example, we'll walk step by step through figuring out what PCI slot and port a network device resides on using a V440. First, we'll get the basic info using "ifconfig -a" (All output here will be summarized somewhat to save trees ;)

host # ifconfig -a
lo0: flags=2001000849 mtu 8232 index 1
inet 127.0.0.1 netmask ff000000
ce3: flags=1000843 mtu 1500 index 3
inet 99.9.99.12 netmask ffffff00 broadcast 99.9.99.255


Now, we know that the device we'll be looking for is "ce3." If there had been another listing up for, say, "ce3:1," we would ignore that, since it's a "virtual" interface.

Now we'll find that NIC's "physical" device path in /etc/path_to_inst:

host # grep ce /etc/path_to_inst|grep -w 3
"/pci@1f,700000/network@1" 3 "ce"


It's good to understand the basic format of /etc/path_to_inst if you need to search it for any information. It's very basic and each line consists of 3 elements, in order. The "physical device path" (the same as you would see if you ran an "ls" on /devices), the "instance number" and the "device driver name." It would probably be more easy to read if the device driver name came before the instance number, but it is what it is ;)

Now we'll check prtdiag to find out what slot this network card is plugged in on (or if it's a built-in port) and what port on the device the cable is (or should be) connected to:

host# prtdiag
System Configuration: Sun Microsystems sun4u Sun Fire V440
...
================================= IO Devices =================================
Bus Freq Slot + Name +
Type MHz Status Path Model
------ ---- ---------- ---------------------------- --------------------
pci 66 MB pci108e,abba (network) SUNW,pci-ce
okay /pci@1f,700000/network@1


And we find that it's, indeed, a built-in card. In this instance, since "prtdiag" doesn't give us much information about the port, we can derive this from the physical name. As a general rule of thumb, if you look at the end of the "Name + Path" column (or the same thing in /etc/path_to_inst) and see "network@0" it's on port 0, and it's on port 1 if you see "network@1" (Remember that the numbering system begins at 0, so instance 0 is always the first port. Note, also, that the "Path" name had no secondary "pci" designation. Generally, if you see a short path from pci to network, you're dealing with a Built-In port, since the first pci addressin the device name is the board)

Here's a quick excerpt (unrelated) from a machine that provides more information on the port and slot numbers (but not the exact matching path!!!! Can you feel the self-doubt eating away at you? Blow it off ;)

========================= IO Cards =========================
...
IO Port Bus Freq Bus Dev,
Brd Type ID Side Slot MHz Freq Func State Name Model
---- ---- ---- ---- ---- ---- ---- ---- ----- -------------------------------- ----------------------
...
I/O PCI 8 B 2 33 33 0,1 ok SUNW,qfe-pci108e,1001 SUNW,pci-qfe/pci-bridg+


In this situation, you'd have to use some deductive reasoning, as well, to be sure.

As a last resort (or a first one if you prefer), check out Sun's Online Documentation Center where you can read all the technical manuals and copy off each model's device-path-to-PCI-slot/port number mappings.

Yay :)

Best wishes,


Creative Commons License


This work is licensed under a
Creative Commons Attribution-Noncommercial-Share Alike 3.0 United States License

#!/bin/ksh

#
# whyDoIHaveToDoThis.sh - find our nic's and their physical device paths in /etc/path_to_inst
#
# 2008 - Mike Golvach - eggi@comcast.net
#
# Creative Commons Attribution-Noncommercial-Share Alike 3.0 United States License
#

ifconfig -a|sed 's/^\([^0-9]*\)\([^:]*\):.*/\1 \2/'|egrep -v 'lo|in|gr'|sort -u|while read one two
do
awk '{ if ( $3 ~ /'"$one"'/ && $2 ~ /'"$two"'/ ) print $0 }' /etc/path_to_inst|sed 's/\"//g'
done

, Mike